Builder’s Timeline: What Really Happens Each Week on Site (QLD)
If you’ve ever driven past a building site and thought, “How is that house still at the same stage?”, you’re not alone.
Most homeowner stress doesn’t come from the work—it comes from mismatched expectations about when the work happens, what “counts as progress”, and why certain weeks look quiet even though the project is moving forward.
This guide is a realistic, Queensland-focused walk-through of a typical new home build timeline—from site establishment and excavation (including the hole for a Plungie Pool) all the way to handover—with the quality checkpoints and classic progress payments you’ll see along the way. It’s written for homeowners in the consideration phase, especially those searching things like home build timeline QLD, construction stages Brisbane, or site milestones Gold Coast.
A quick note before we start: every site is different. Soil class, slope, access, weather, design complexity, approvals, variations, trade availability, and supply lead times can compress or stretch the schedule. The aim here is to show the sequence, what’s happening behind the scenes, and why builders don’t simply “do everything at once”.
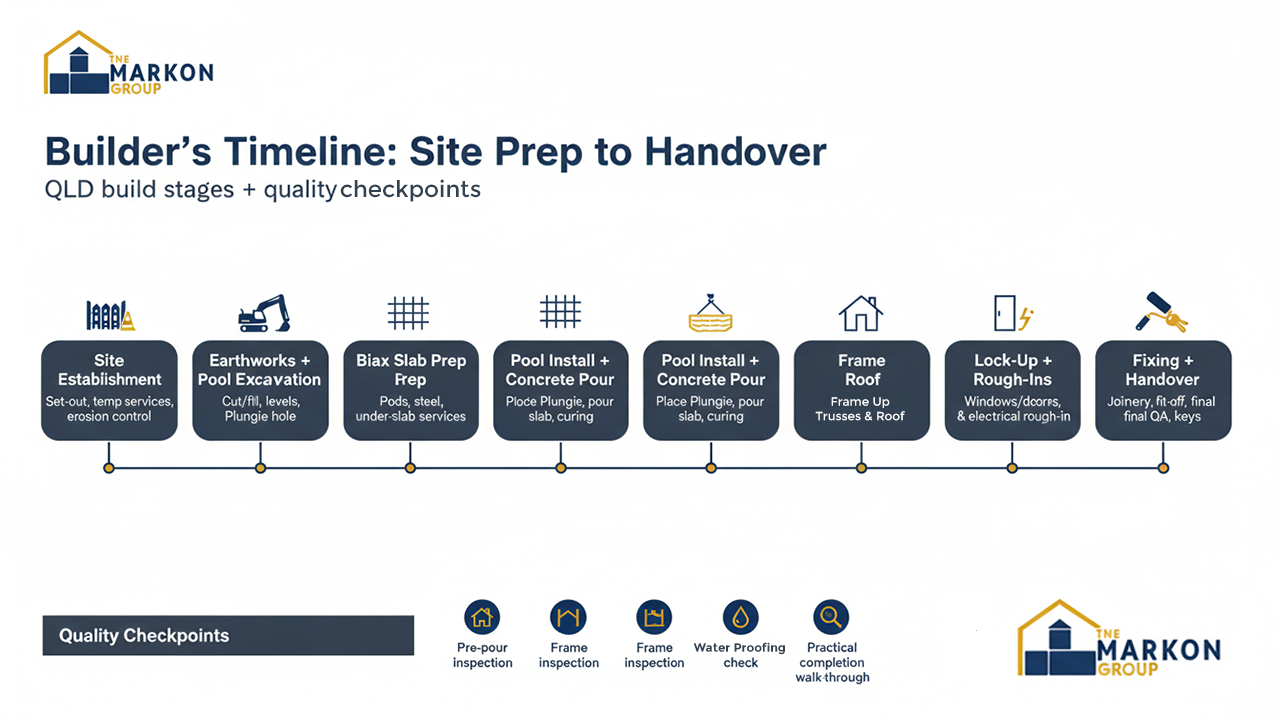
Quick visual overview (Gantt-style stage map)
Below is a simplified stage map. Your build might run faster or slower, but the order and dependencies are broadly consistent.
- Weeks 1–2: Site establishment + earthworks + pool excavation
- Weeks 2–4: Pool placement + under-slab services + Biax slab prep
- Weeks 4–5: Slab pour + cure
- Weeks 5–8: Frame + roof structure
- Weeks 8–10: Roof cover + wrap + windows (toward “lock-up”)
- Weeks 10–13: Rough-ins (plumbing/electrical/HVAC)
- Weeks 13–16: Linings + waterproofing + tiling
- Weeks 16–19: Fixing stage (joinery, doors, paint, fit-off)
- Weeks 19–22: External works + final checks + practical completion
- Handover: Documentation, keys, warranties, orientation
If you want this as an actual downloadable roadmap, that’s exactly what we provide as part of a stage-by-stage planning approach.
Progress payments (the “classic” structure)
Most residential building contracts in QLD follow a staged payment structure. Exact percentages vary by contract and inclusions, but the familiar pattern is:
- Deposit / initial payment (often limited by QLD rules—your contract should state the maximum)
- Base stage (slab/foundations completed)
- Frame stage (frame and trusses up, bracing complete)
- Lock-up / enclosed stage (external doors/windows on, roof on—home can be secured)
- Fixing stage (internal linings, cabinets, waterproofing/tiling, fit-off underway)
- Practical completion / completion (final works done; ready for handover)
The key homeowner takeaway: progress payments are tied to milestones, not “how busy the site looks” on any single day.
Stage 0 (Pre-start): what happens before you see machinery
A lot of the build timeline happens before the first excavator turns up. This is where many delays live—and also where a well-run builder earns their keep.
Typical pre-start items (often weeks to months, running in parallel):
- Final drawings + engineering: structural design, wind classification, tie-downs, slab design (especially important on reactive clay sites common around Brisbane/Gold Coast corridors).
- Soil testing and site assessment: informs slab type, piering needs, drainage strategy, and cut/fill approach.
- Approvals: building approval/certifier coordination, energy compliance, any estate covenants, and in some cases additional council-related requirements depending on the site.
- Selections: finishes, appliances, tiles, cabinetry, electrical layout, lighting plan, and any upgrades (this is a major schedule lever—late selections can stall procurement).
- Ordering long-lead items: windows/doors, electrical gear, hot water systems, specialty cladding, custom joinery, and—if you’re adding it—your pool coordination.
Quality checkpoint mindset:
This is where errors are cheapest to fix. A missed step here becomes a costly variation later. A good builder will push clarity early: confirmed drawings, signed selection schedules, and clear responsibility lines (who supplies what, who installs what, and when).
Stage 1 (Week 1): site establishment—setting the “rules of the site”
Week 1 rarely looks dramatic, but it’s foundational. Think of this as setting up a controlled environment so construction can happen safely, legally, and efficiently.
What usually happens:
- Site set-out: surveyors mark boundaries, offsets, and reference points so the house and pool go exactly where they’re meant to.
- Temporary services: temporary power (and sometimes temporary water), site toilet, and basic site access preparation.
- Erosion and sediment control: required to manage stormwater runoff and protect surrounding areas.
- Safety and compliance setup: signage, site fencing (where required), and initial site induction expectations.
What homeowners often misunderstand:
You might not see “building” yet, but without correct set-out and controls, everything that follows is at risk—especially slab accuracy, levels, and boundary compliance.
Quality checkpoints:
- Confirm set-out aligns with drawings (particularly setbacks and finished floor levels).
- Confirm access plan: where trucks will enter/exit, where spoil goes, and how the pool delivery will be handled later.
Stage 2 (Weeks 1–2): earthworks—clearing, cut/fill, and excavating the Plungie Pool hole
Now the site starts to look like a real project. Earthworks is where the build either gets a clean runway—or inherits hidden problems that surface later.
What typically happens:
- Clearing and stripping: removing vegetation, topsoil, debris, and any unsuitable material.
- Cut and fill: shaping the pad to achieve the designed levels; managing spoil (removal or reuse).
- Trenching and preliminary drainage considerations: especially important in QLD storm seasons.
- Pool excavation (Plungie Pool hole): excavating to the engineered dimensions for the pool shell and base preparation.
A note on the Plungie Pool (and why it can save time on site)
As we touched on in our earlier quick overview, one of the biggest advantages of a pre-installed, factory-built concrete plunge pool is time and predictability. Instead of building a pool from scratch on site—formwork, steel fixing, multiple inspections, pours, curing, waterproofing steps, and weather exposure—you’re bringing in a pool that’s manufactured in controlled conditions and installed on site with a tight, planned sequence.
In practical terms, that can mean:
- Less on-site construction complexity (fewer moving parts and fewer wet-weather vulnerability points)
- Faster transition from “hole in the ground” to “pool shell installed”
- Cleaner scheduling because a crane-and-place day is easier to plan than weeks of staged pool construction
You still need excellent preparation (base, levels, plumbing connections, backfill method), but the time-saving comes from reducing extended on-site trade stacking and weather-dependent processes.
Quality checkpoints:
- Ensure the excavation is correct for both depth and clearance (including working room for placement).
- Confirm spoil management plan so the site doesn’t choke itself with stockpiles.
- Verify levels: pool and house levels must work together so you don’t create drainage headaches later.
Stage 3 (Weeks 2–4): pool placement + under-slab preparation (this is where coordination matters)
If you’re integrating a Plungie Pool with a new build, the sequencing becomes crucial. The pool isn’t an afterthought; it’s a major site element with access requirements and a “don’t paint yourself into a corner” delivery plan.
Pool installation sequence (typical)
- Base preparation: compacted bedding and any specified base material to create a stable, level platform.
- Delivery and crane lift: the pool is craned into position—this is a high-coordination day (access, overhead clearance, ground bearing, weather, and spotter requirements).
- Initial plumbing tie-ins: suction/return lines, any provision for heating, and equipment location planning.
- Backfilling strategy: done carefully in layers to support the shell without creating voids or uneven pressure.
What homeowners notice:
This is one of those milestone days where the site suddenly looks “advanced”. One day you have a hole; the next day you have a pool shell. It’s exciting—and it’s also why planning matters. If access isn’t protected, you can end up delaying other deliveries later.
Under-slab groundwork begins
In parallel (or immediately after, depending on the site plan), the builder starts the groundwork for the slab:
- Service rough-ins under slab: sewer/stormwater where applicable, water lines, conduit for electrical runs, and any penetrations that must be in place before the slab is poured.
- Formwork and boxing: defines slab edges, steps, rebates, and set-downs (wet areas often have set-downs to manage waterproofing and finished floor levels).
- Termite management: physical barriers or chemical systems (QLD is termite country—this step matters).
Quality checkpoints:
- Confirm all under-slab services are pressure-tested/checked before they disappear under concrete.
- Confirm set-downs and penetrations match plans (changing later is painful and expensive).
- Confirm pool equipment location is practical for noise, access, and maintenance.
Stage 4 (Weeks 3–5): Biax slab foundation—what it is and why it takes time
If your build uses a Biax slab system, it’s usually because the engineering calls for it—often due to reactive soil conditions and the need to reduce ground movement impacts.
In plain language:
A Biax slab uses void formers (often dome-like pods) to create engineered voids under parts of the slab, reducing contact with reactive soils and helping manage heave/shrink effects. It’s a clever system, but it’s also detail-heavy—meaning it rewards careful installation and inspection.
What happens during Biax slab prep:
- Final trim and level: the pad is brought to precise tolerances.
- Moisture barrier and preparation layers: depending on design.
- Placement of Biax pods/formers: laid out to engineered spacing.
- Reinforcement installation: steel placement is extensive and must match engineering exactly.
- Edge beams and internal beams: formed and reinforced.
- Pre-pour inspection: by the appropriate inspector/certifier/engineer as required.
Why this stage can look “slow” from the street:
Much of the work is inside the formwork footprint and is technical rather than visually dramatic. But it’s one of the most important stages of the entire build—errors here echo forever.
Quality checkpoints:
- Steel spacing, lap lengths, bar chairs, and cover depth match engineering.
- All penetrations are where they should be (plumbing, electrical conduits).
- Termite barrier is installed correctly and will be certifiable later.
- Slab set-out matches the survey marks (no creeping out of alignment).
Stage 5 (Week 4–5): pouring concrete—slab day, finishing, and curing
Slab pour day is one of the first major “photo milestone” moments. It’s also a day where preparation matters more than heroics. A good slab pour is won in the days before the truck arrives.
What happens:
- Concrete pour: coordinated deliveries, pump setup if needed, pour sequencing.
- Finishing: screeding, troweling, edges, and surface finish depending on specification.
- Curing: concrete needs time to gain strength. Some builders use curing compounds or curing practices consistent with the spec.
What happens after the pour:
- Strip formwork (timing depends on design and curing)
- Set-out for frame: the slab becomes the reference platform for everything else.
Quality checkpoints:
- Levels and squareness (a slab can be “solid” but still wrong).
- Step-downs, rebates, and wet area set-downs correct.
- Anchor points/hold-downs installed where required by engineering.
Progress payment milestone:
This typically triggers the Base stage payment.
Stage 6 (Weeks 5–8): framing—where the house suddenly appears
Framing is the stage that feels like the biggest leap in progress because the home goes vertical quickly.
What happens:
- Wall frames erected: external and internal walls, bracing elements.
- Roof trusses installed: roof shape becomes clear; tie-downs and bracing are critical in QLD wind conditions.
- Structural connections: straps, brackets, bolts—these are not “extras”, they’re engineered requirements.
Why framing sometimes pauses:
- Waiting on trusses
- Wet weather
- Frame inspection scheduling
- Rectification of bracing/tie-down details
Quality checkpoints:
- Frame straightness and plumb (small issues become big problems at plaster stage).
- Correct openings for windows/doors (a common headache if wrong).
- Bracing and tie-down installed per engineering.
- Frame inspection completed as required.
Progress payment milestone:
This usually triggers the Frame stage payment.
Stage 7 (Weeks 8–10): roof on + wrap + windows—moving toward “lock-up”
Once the roof cover goes on and the building is wrapped and glazed, the site becomes more weather-protected. This is when the project often accelerates—if materials are on time.
What happens:
- Roof installation: tiles or metal roofing, sarking/blanket as specified, flashings, gutters.
- Wall wrap/sarking: improves weather resistance and performance.
- Windows and external doors: installed with proper flashing and sealing.
- External cladding/brickwork (if applicable): may run alongside this stage and can extend the timeline depending on material and labour availability.
Quality checkpoints:
- Flashing details around windows/doors (water ingress issues often start here).
- Roof penetrations sealed properly (vents, flues).
- Gutters/falls correct and downpipes planned for real drainage outcomes, not just “somewhere to go”.
Progress payment milestone:
Often aligns with Lock-up or “Enclosed” stage once the home can be secured and is weather-tight enough for internals to proceed.
Stage 8 (Weeks 10–13): rough-ins—plumbing, electrical, HVAC, and the hidden guts
This is where the home becomes functional, but it can look underwhelming because most work is inside walls, ceilings, and floors.
What happens:
- Electrical rough-in: wiring, switch locations, lighting runs, data points, smoke alarm wiring.
- Plumbing rough-in: water lines, wastes, and fixtures positioning.
- Air-conditioning rough-in (if included): ducting, return air, condensate drainage planning.
- In-wall/in-ceiling reinforcements: noggins for towel rails, grab rails (future-proofing), wall-hung vanities, TVs.
Homeowner tip:
If you’ve ever thought, “Can we just move that power point later?”—this is the last easy moment. After plasterboard, changes become patching, repainting, and sometimes re-certifying.
Quality checkpoints:
- Pressure tests where required.
- Correct positioning of services (especially shower mixers, floor wastes, and cabinetry interfaces).
- Pre-lining walkthrough: check the practical usability of selections (bedside power, island pendants, pantry lighting, outdoor power, etc.).
Stage 9 (Weeks 13–16): insulation, linings, waterproofing, and tiling—where quality really shows
This stage includes some of the most quality-sensitive steps of the entire build, even though it’s not always glamorous.
What happens:
- Insulation installed: walls and ceilings as specified.
- Plasterboard (gyprock) lining: walls and ceilings go on, then stopping/sanding.
- Waterproofing: bathrooms, laundries, and other wet areas—critical for durability.
- Tiling: starts after waterproofing cures and inspections (where applicable).
Why this stage matters so much:
- Waterproofing failures don’t show immediately; they show when it’s expensive.
- Poor wall straightness becomes obvious under lighting and with cabinetry lines.
- Tiling quality affects both aesthetics and maintenance for decades.
Quality checkpoints:
- Wet area waterproofing is done to applicable standards and manufacturer systems.
- Falls to floor wastes correct (no “birdbaths”).
- Tile layouts planned (avoid tiny cuts in feature locations).
- Junctions sealed properly (silicone vs grout in movement joints).
Progress payment milestone:
Depending on the contract, payment may still be at lock-up until fixing begins, or it may be structured differently. Many builders align a major payment with the Fixing stage once internal fit-out is underway.
Stage 10 (Weeks 16–19): fixing stage—joinery, internal doors, painting, and fit-off begins
Fixing is where the home starts to feel yours. Cabinets go in, rooms take shape, and the finish line finally looks real.
What happens:
- Cabinetry and joinery installation: kitchen, vanities, laundry, robes.
- Internal doors, skirtings, architraves: trims define the final look.
- Painting: undercoat through to top coats depending on sequence and flooring type.
- Stairs and balustrades (if applicable)
- Bench tops: templated then installed (stone timing can affect schedule).
Why fixing can take longer than people expect:
- Trades stack tightly and must be sequenced carefully (you can’t install certain items until others are complete).
- Benchtops, shower screens, mirrors, and specialty items often have fabrication lead times.
Quality checkpoints:
- Cabinet alignment, door gaps, and hardware operation.
- Paint finish under real lighting (natural light reveals everything).
- Wet area fit-off preparation: waterproofing not compromised during fixing works.
Progress payment milestone:
This commonly triggers the Fixing stage payment.
Stage 11 (Weeks 19–22): finishing works—fit-off, flooring, externals, pool commissioning
This is the “100 tiny jobs” phase. It’s also where homeowners can feel the most impatient, because the house looks nearly done—but completion is all about detail, testing, and certificates.
Internal fit-off typically includes:
- Electrical fit-off: switches, power points, lights, fans, appliances.
- Plumbing fit-off: taps, toilets, basins, showers, hot water.
- HVAC fit-off: grills, thermostats, commissioning.
- Shower screens and mirrors
- Flooring installation: tiles (if not done), timber/vinyl, carpet.
- Final caulking and touch-ups
External works often include:
- Driveway and paths
- Fencing and gates
- External painting and finishes
- Drainage completion: ensuring water is directed away correctly
- Landscaping (scope varies—sometimes by owner after handover)
Pool-side completion (varies by inclusion):
- Equipment setup and commissioning: filtration, chlorination/sanitation system, heating provisions if included.
- Surrounds: coping, paving, decking interfaces (depends on design scope).
- Safety compliance planning: QLD pool safety requirements are strict—this needs to be handled properly with the right sequence and documentation.
Quality checkpoints:
- Functional testing: lights, power circuits, hot water, taps, drainage, appliances.
- Final water management: downpipes connected, surface falls sensible, no ponding against slab.
- Pool equipment accessible, labeled, and explained (not just “installed”).
Stage 12: practical completion, final inspections, and handover (the last 5%)
The last stage is where a well-managed build feels calm instead of chaotic. The home should be clean, complete, and documented—not “mostly done, just a few things”.
Practical completion typically includes:
- Final inspection / walkthrough: builder-led check and often a client walkthrough.
- Defects and touch-ups: paint, silicone, door adjustments, minor alignment fixes.
- Compliance documentation: certificates for relevant work (electrical, plumbing, waterproofing where applicable, termite protection, and any required forms/sign-offs).
- Final clean: builders clean so the home is presentable for handover.
Handover day usually covers:
- Keys and access devices
- Appliance manuals and warranty information
- Maintenance guidance (paint care, caulking expectations, drainage care, ventilation habits)
- Pool orientation (if included): equipment operation, basic maintenance, recommended service rhythm
- Defects liability process: how to log issues and what timeframes apply
Progress payment milestone:
This is typically the Practical completion / Completion payment, due when the home meets the contract definition of completion (subject to the specifics of your agreement).
Why some weeks look “quiet” (but aren’t)
A realistic home build timeline in QLD includes coordination time—because construction is a sequencing game. Common reasons you’ll see fewer people on site for a few days:
- Waiting for an inspection sign-off before proceeding
- Wet weather (especially at slab/earthworks and external stages)
- Lead times for windows, benchtops, shower screens, specialty items
- Trade sequencing (e.g., waterproofing cure time before tiling; paint dry time before fit-off)
- Rectification work (good builders fix issues before covering them up)
The quality checkpoints that protect your investment (stage-by-stage)
If you only remember one thing: quality is easier to verify before things get covered.
Here are the checkpoints that matter most:
- Set-out & levels: prevents boundary and drainage disasters
- Under-slab services + termite barrier: must be right before concrete
- Biax + reinforcement verification: engineering compliance
- Slab pour quality: levels, set-downs, cure approach
- Frame inspection: straightness, bracing, tie-downs
- Wrap/windows/flashings: water management
- Rough-in walkthrough: usability and positioning
- Waterproofing and tiling: longevity
- Fit-off testing: functional commissioning before handover
- Documentation: warranties and compliance are part of the product
Putting it all together: a realistic homeowner mindset
Building is rarely a smooth diagonal line on a chart. It’s more like a staircase:
- Big visible jumps (slab, frame, roof)
- Technical phases (rough-ins, waterproofing, fixing)
- Detail-heavy closing stages (fit-off, testing, certifications, final clean)
And when you add a pool—especially a well-planned, pre-installed Plungie Pool—your timeline can actually become more predictable if the access, sequencing, and responsibilities are locked in early.
Contact The Markon Group today:
📍 Location: 20–24 Commerce Drive, Browns Plains, Brisbane
📞 Phone: +61 7 3153 2000
🌐 Website: www.markongroup.com.au
✉️ Email: info@homesbymarkon.com.au
Building futures for Queensland families.